Configuring SWGEmu (Core3) on WSL 2
After installing WSL2, it’s time to setup Core3. For this guide, we’ll be will be using Windows Terminal and Ubuntu 18.04, but you may use any CLI and distro you prefer.
You may follow this link to install Windows Terminal or launch the CLI for Ubuntu which you installed in the previous guide by launching the “Ubuntu” app in WIndows 10.
Installing Dependencies
Open your CLI and install the dependencies for Core3 by running the following command:
sudo apt install build-essential libmariadbclient-dev libmariadbclient-dev-compat liblua5.3-dev libdb5.3-dev libssl-dev cmake git mariadb-server default-jre libssl-dev git rsync
This includes all the libaries for C++, Lua, MySQL database and other utilites such as git, rsync and more.
Configure Your Bash
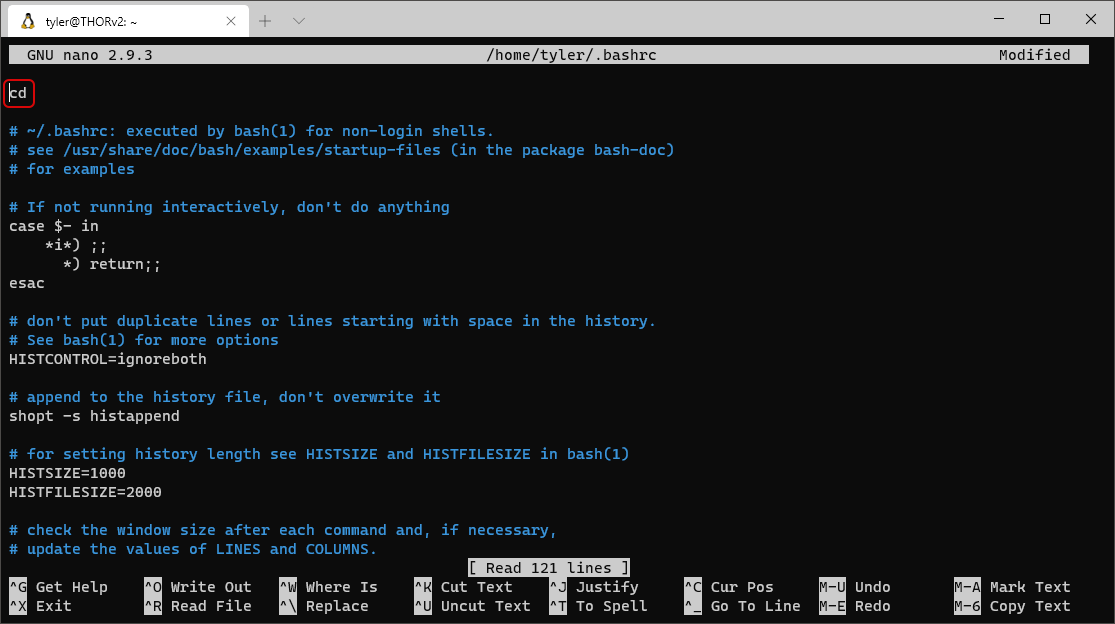
First let’s configure your bashrc file so when you open your CLI it defaults to your user directory in WSL.
- Open your bashrc file in nano:
nano ~/.bashrc - At the top of your bashrc file add the text
cdon a new line. - Save the file with
ctrl+oand enter to confirm,ctrl+xto exit. - Close your CLI and reopen it.

Downloading Core3
In your user directory, ex: /home/yourname make a workspace directory to clone Core3 and enter it.
mkdir workspace
cd workspace
Clone your repository, replacing https://github.com/swgemu/Core3.git with your project’s url.
git clone https://github.com/swgemu/Core3.git
Building Core3
Once you have cloned the repository, enter your projects MMOCoreOrb folder, replacing <repo> with the name of your repository.
cd <repo>/MMOCoreORB
Before building, make sure you are on the correct branch by running git branch to check your branch, then git checkout <branch> if you need to change it. (Replacing
When you are sure you’re on the right branch, in the MMOCoreOrb folder run the following command to build:
make -j $(nproc)
MySQL Setup
Start the MySQL Server, enter your root password if prompt:
sudo service mysql start
Secure your MySQL instllation (Optional Step) - Recommended
- Run:
sudo mysql_secure_installation - Enter
Noon setting a root password - Enter
Yeson every other question
Enter MySQL Command Line Client
sudo mysql
Create a MySQL database for Core3.
create database swgemu;
Create a user for the database you’ve created.
create user 'swgemu'@'localhost' identified by '123456';
Grant the user permissions to your database, then exit MySQL
grant all on swgemu.* to 'swgemu'@'localhost';
quit
Importing MySQL Data
Change directory to the MMOCoreOrb/sql folder and import the data from the swgemu.sql into your database.
cd sql
sudo mysql swgemu < swgemu.sql
Updating Server IP Address
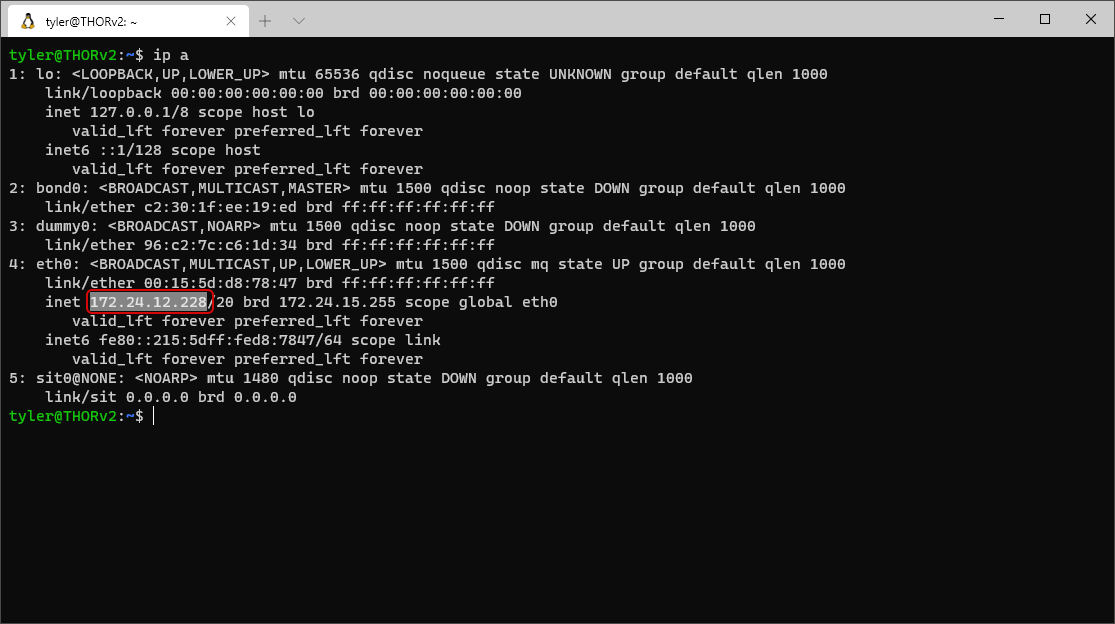
Get the Linux Subsystem’s IP address. Note: You will also need to add this to your Game Client (Directions after Server setup)
ip a
 You can copy the text by highlighting the IP address then right clicking on it.
Enter MySQL.
sudo mysql
Select the swgemu database.
use swgemu;
Update the IP address for the galaxy, replacing <your ip> with the IP address of your Linux Subsystem, then quit.
update galaxy set address='<your ip>' where galaxy_id='2';
quit
Copy TRE Files to the Server and Config
Navigate to your workspace directory and make a folder named tre.
cd ~/workspace
mkdir tre
Copy your tre files using rsync from your SWG Game Client folder to your server with the following. Replacing <your SWG dir> with the path to your SWG Game Client folder.
rsync -av /mnt/c/<your SWG dir>/*.tre tre/
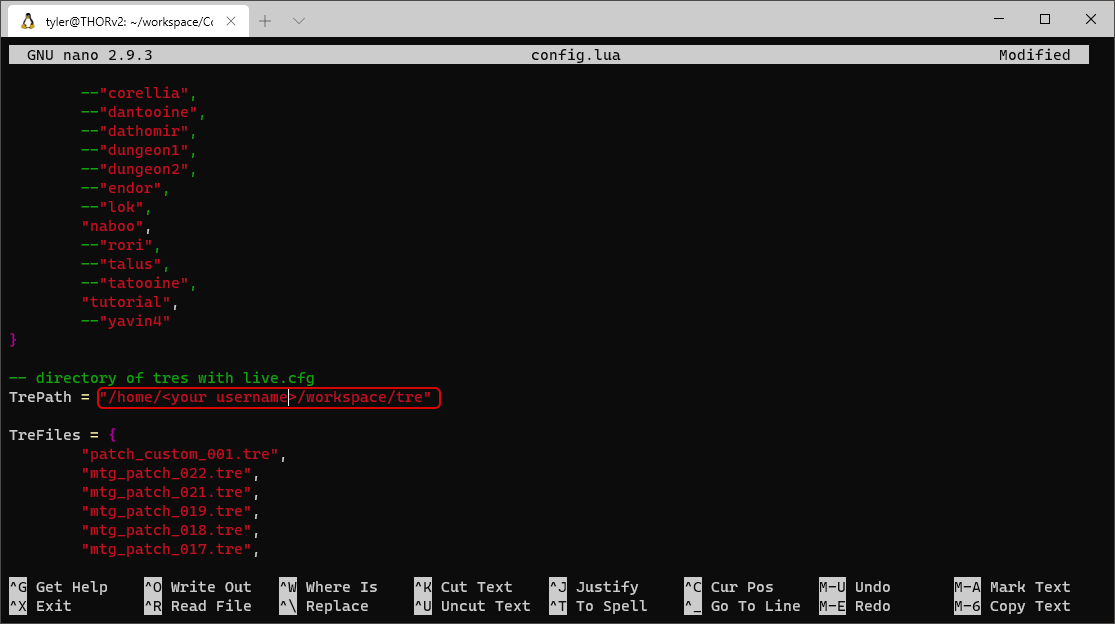
Navigate to your server’s configuration file folder and open config.lua in nano. Note, this file may look slightly different depending on your publish or server base.
nano config.lua
- On ~143, looks for:
TrePath - Change
"/home/swgemu/Desktop/SWGEmu"to"/home/<your username>/workspace/tre" - Replacing
<your username>with the username of your Linux Subsystem account. - Save the file with
ctrl+oand enter to confirm,ctrl+xto exit.

Starting the Server
If still in the conf folder, move up a directory with cd ../ to the bin folder.
To start the server, run the following in the MMOCoreORB/bin folder:
./core3
The server should now boot, this will take some time depending on your computer hardware.
Shutting Down the Server
In the CLI window with the server running, enter the command shutdown to gracefully save and shut down the server.
To terminate the server process, hit ctrl+c on your keyboard.
Connecting to your Server
In your Windows Environment, go to your SWG Game Client directory.
- Open the
swgemu_login.cfgfile. - Replace the IP at
loginServerAddress0=with the IP address of the server obtained earlier with theip acommand. - Your swgemu_login.cfg should look as follows:
[ClientGame] loginServerAddress0=<your servers ip> loginServerPort0=44453 freeChaseCameraMaximumZoom=5 - Save the file.
Now run your SWGEmu.exe client to connect to your server.
It is highly suggested to read the Creating an Admin Account section before proceeding.
Creating an Admin Account
Connect to your server with your SWG Game Client and create an account. Do not create any characters, then exit your client and shut down your server.
Enter MySQL and the swgemu database:
sudo mysql
use swgemu;
Do the following MySQL query to update the account you just created to an administrator and quit:
update accounts set admin_level='15' where account_id='1';
quit
You may now reconnect to your account and any newly created characters will have Administration privileges.
If you still do not have admin privilges, you need to add the following to your user.cfg file in your SWG Game Client:
[ClientGame]
0fd345d9 = true